A Step-by-Step Guide to Enhanced Conversions for Google Ads with Shopify's New Checkout Update
A Step-by-Step Guide to Enhanced Conversions for Google Ads with Shopify's New Checkout Update


You'll learn how to get Google Tag Manager added back to your store's checkout so that you can measure conversions for Google Ads and any tags you need to add afterward.
You'll learn how to get Google Tag Manager added back to your store's checkout so that you can measure conversions for Google Ads and any tags you need to add afterward.
You'll learn how to get Google Tag Manager added back to your store's checkout so that you can measure conversions for Google Ads and any tags you need to add afterward.
In this post:
In this post:
In this post:
Section
Section
Section
In August 2024, Shopify transitioned all merchants to a new one-page checkout. While this might make for an easier experience for customers, and even has some security advantages, this update might've disrupted your conversion tracking.
If, like a lot of merchants, you were using Shopify's order status page scripts to load Google Tag Manager or other tracking scripts, the checkout update removed that functionality and caused your conversion tracking to stop working.
You can now set up custom conversion tracking scripts as "Custom Pixels" in the Customer Events tab under your store's Settings. In this post, we'll do a step-by-step walkthrough on how you can add your Google Tag Manager container to your store's checkout section via this new, more secure method.
Prefer video over text? You can also watch this entire walkthrough as a video:
Adding a Custom Pixel
To add a custom pixel, go to your store's Settings, then click the Customer Events option. If you are tracking any conversion events via apps, like Meta's CAPI integration, for example, you'll see those here. You'll also see the option to add a custom pixel, which is what we'll be doing to set up Google Tag Manager. To add your custom pixel, click the "Add a Custom Pixel" button in the upper-right.
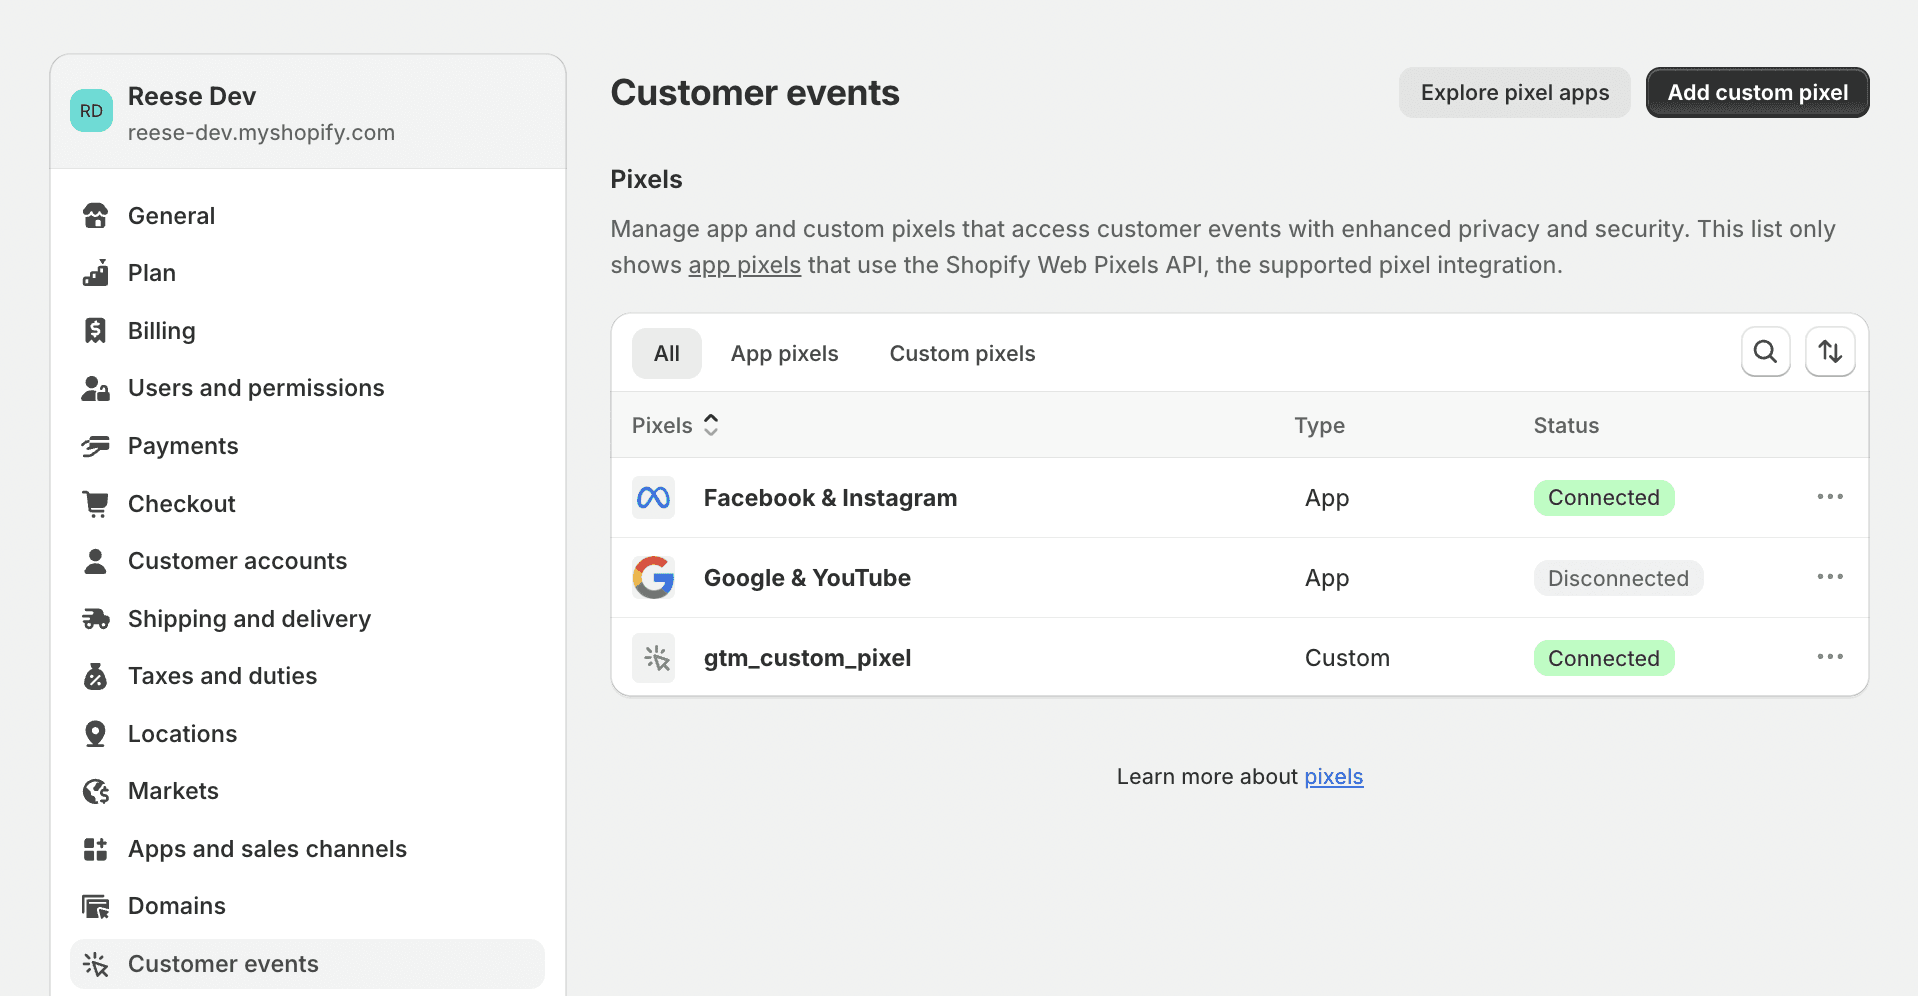
This will bring up a prompt to name your custom pixel. Typically, I recommend something like "gtm_custom_pixel" or even your GTM container ID so that it's easy to identify.
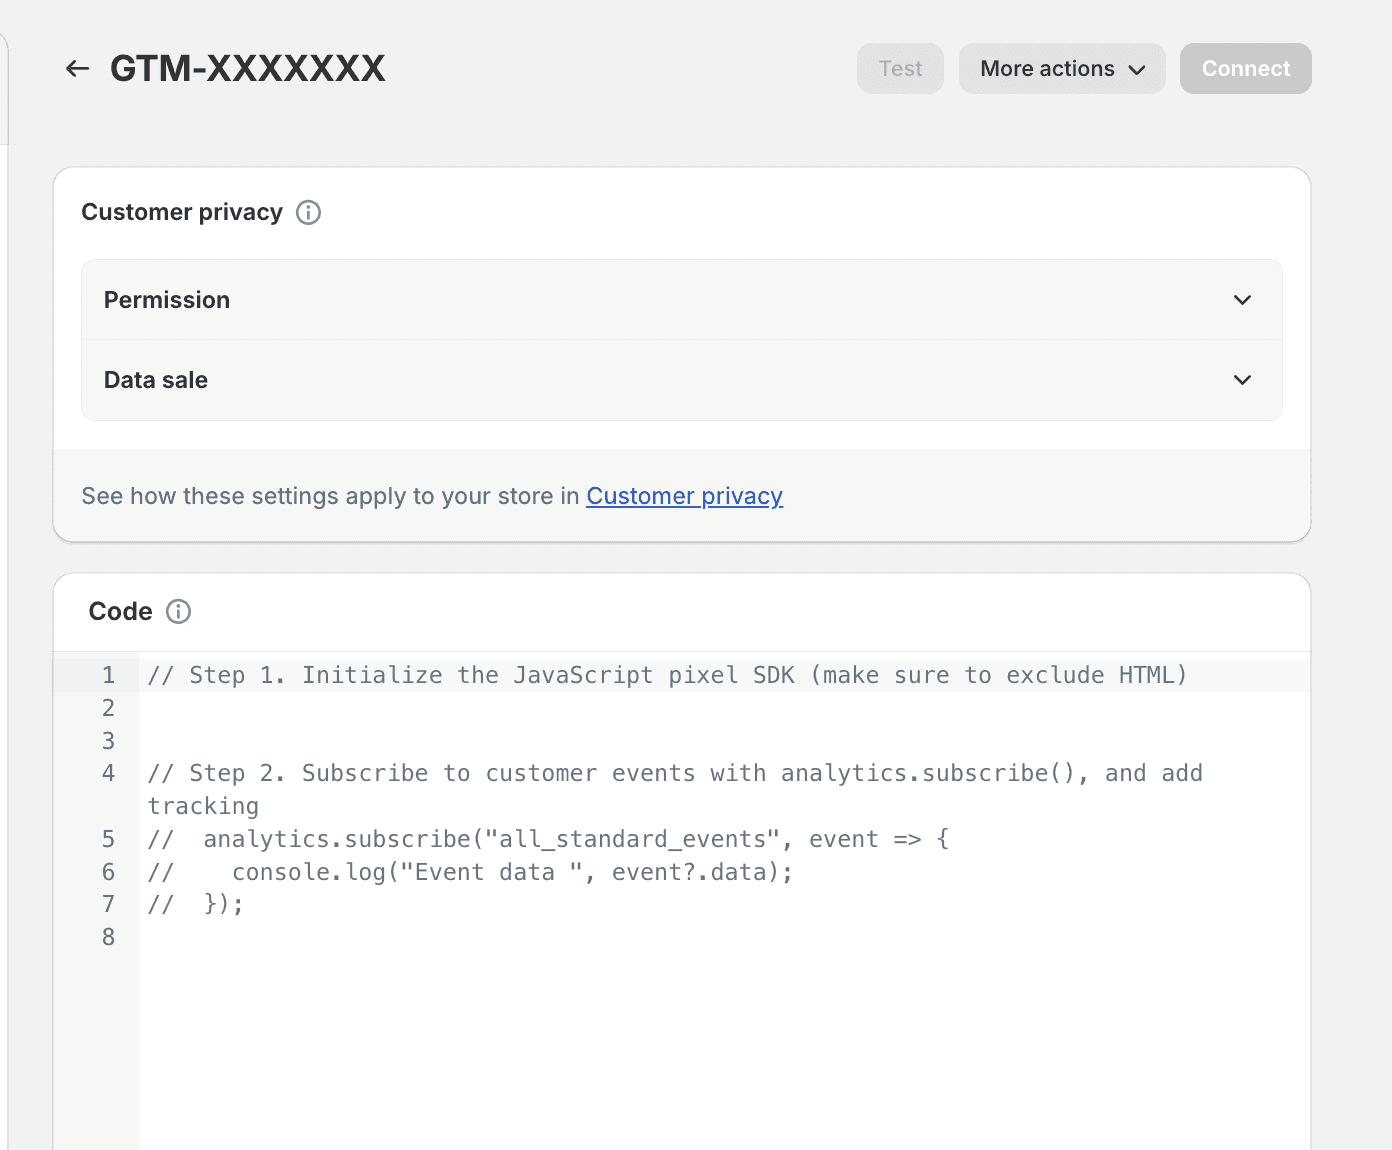
Once you've created your custom pixel, you'll see a screen with some placeholder code. This is where we'll paste the code that will allow you to add your GTM container to checkout and track purchases.
Setting Up Google Tag Manager
Don't worry—you don't need to be a JavaScript expert to get through this next section. Shopify has a useful custom pixel template in their support docs. If you don't plan on setting up consent mode for now, you can also copy this version that removes the Google Consent Mode v2 function:
// Define dataLayer and the gtag function.
window.dataLayer = window.dataLayer || [];
function gtag(){dataLayer.push(arguments);}

//Initialize GTM tag
(function(w,d,s,l,i){w[l]=w[l]||[];w[l].push({'gtm.start':
new Date().getTime(),event:'gtm.js'});var f=d.getElementsByTagName(s)[0],
j=d.createElement(s),dl=l!='dataLayer'?'&l='+l:'';j.async=true;j.src=
'https://www.googletagmanager.com/gtm.js?id='+i+dl;f.parentNode.insertBefore(j,f);
})(window,document,'script','dataLayer', 'GTM-XXXXXXX');

//subscribe to events
analytics.subscribe("checkout_completed", (event) => {
  window.dataLayer.push({
    event: "checkout_completed",
    timestamp: event.timestamp,
    id: event.id,
    token: event.data?.checkout?.token,
    url: event.context.document.location.href,
    client_id: event.clientId,
    email: event.data?.checkout?.email,
    phone: event.data?.checkout?.phone,
    first_name: event.data?.checkout?.shippingAddress?.firstName,
    last_name: event.data?.checkout?.shippingAddress?.lastName,
    address1: event.data?.checkout?.shippingAddress?.address1,
    address2: event.data?.checkout?.shippingAddress?.address2,
    city: event.data?.checkout?.shippingAddress?.city,
    country: event.data?.checkout?.shippingAddress?.country,
    countryCode: event.data?.checkout?.shippingAddress?.countryCode,
    province: event.data?.checkout?.shippingAddress?.province,
    provinceCode: event.data?.checkout?.shippingAddress?.provinceCode,
    zip: event.data?.checkout?.shippingAddress?.zip,
    orderId: event.data?.checkout?.order?.id,
    currency: event.data?.checkout?.currencyCode,
    subtotal: event.data?.checkout?.subtotalPrice?.amount,
    shipping: event.data?.checkout?.shippingLine?.price?.amount,
    value: event.data?.checkout?.totalPrice?.amount,
    tax: event.data?.checkout?.totalTax?.amount,
  });
});

analytics.subscribe("payment_info_submitted", (event) => {
  window.dataLayer.push({
    event: "payment_info_submitted",
    timestamp: event.timestamp,
    id: event.id,
    token: event.data?.checkout?.token,
    url: event.context.document.location.href,
    client_id: event.clientId,
    email: event.data?.checkout?.email,
    phone: event.data?.checkout?.phone,
    first_name: event.data?.checkout?.shippingAddress?.firstName,
    last_name: event.data?.checkout?.shippingAddress?.lastName,
    address1: event.data?.checkout?.shippingAddress?.address1,
    address2: event.data?.checkout?.shippingAddress?.address2,
    city: event.data?.checkout?.shippingAddress?.city,
    country: event.data?.checkout?.shippingAddress?.country,
    countryCode: event.data?.checkout?.shippingAddress?.countryCode,
    province: event.data?.checkout?.shippingAddress?.province,
    provinceCode: event.data?.checkout?.shippingAddress?.provinceCode,
    zip: event.data?.checkout?.shippingAddress?.zip,
    orderId: event.data?.checkout?.order?.id,
    currency: event.data?.checkout?.currencyCode,
    subtotal: event.data?.checkout?.subtotalPrice?.amount,
    shipping: event.data?.checkout?.shippingLine?.price?.amount,
    value: event.data?.checkout?.totalPrice?.amount,
    tax: event.data?.checkout?.totalTax?.amount,
  });
});

analytics.subscribe("checkout_shipping_info_submitted", (event) => {
  window.dataLayer.push({
    event: checkout_shipping_info_submitted,
    timestamp: event.timestamp,
    id: event.id,
    token: event.data?.checkout?.token,
    url: event.context.document.location.href,
    client_id: event.clientId,
    email: event.data?.checkout?.email,
    phone: event.data?.checkout?.phone,
    first_name: event.data?.checkout?.shippingAddress?.firstName,
    last_name: event.data?.checkout?.shippingAddress?.lastName,
    address1: event.data?.checkout?.shippingAddress?.address1,
    address2: event.data?.checkout?.shippingAddress?.address2,
    city: event.data?.checkout?.shippingAddress?.city,
    country: event.data?.checkout?.shippingAddress?.country,
    countryCode: event.data?.checkout?.shippingAddress?.countryCode,
    province: event.data?.checkout?.shippingAddress?.province,
    provinceCode: event.data?.checkout?.shippingAddress?.provinceCode,
    zip: event.data?.checkout?.shippingAddress?.zip,
    orderId: event.data?.checkout?.order?.id,
    currency: event.data?.checkout?.currencyCode,
    subtotal: event.data?.checkout?.subtotalPrice?.amount,
    shipping: event.data?.checkout?.shippingLine?.price?.amount,
    value: event.data?.checkout?.totalPrice?.amount,
    tax: event.data?.checkout?.totalTax?.amount,
  });
});

analytics.subscribe("checkout_address_info_submitted", (event) => {
  window.dataLayer.push({
    event: "checkout_address_info_submitted",
    timestamp: event.timestamp,
    id: event.id,
    token: event.data?.checkout?.token,
    url: event.context.document.location.href,
    client_id: event.clientId,
    email: event.data?.checkout?.email,
    phone: event.data?.checkout?.phone,
    first_name: event.data?.checkout?.shippingAddress?.firstName,
    last_name: event.data?.checkout?.shippingAddress?.lastName,
    address1: event.data?.checkout?.shippingAddress?.address1,
    address2: event.data?.checkout?.shippingAddress?.address2,
    city: event.data?.checkout?.shippingAddress?.city,
    country: event.data?.checkout?.shippingAddress?.country,
    countryCode: event.data?.checkout?.shippingAddress?.countryCode,
    province: event.data?.checkout?.shippingAddress?.province,
    provinceCode: event.data?.checkout?.shippingAddress?.provinceCode,
    zip: event.data?.checkout?.shippingAddress?.zip,
    orderId: event.data?.checkout?.order?.id,
    currency: event.data?.checkout?.currencyCode,
    subtotal: event.data?.checkout?.subtotalPrice?.amount,
    shipping: event.data?.checkout?.shippingLine?.price?.amount,
    value: event.data?.checkout?.totalPrice?.amount,
    tax: event.data?.checkout?.totalTax?.amount,
  });
});

analytics.subscribe("checkout_contact_info_submitted", (event) => {
  window.dataLayer.push({
    event: "checkout_contact_info_submitted",
    timestamp: event.timestamp,
    id: event.id,
    token: event.data?.checkout?.token,
    url: event.context.document.location.href,
    client_id: event.clientId,
    email: event.data?.checkout?.email,
    phone: event.data?.checkout?.phone,
    first_name: event.data?.checkout?.shippingAddress?.firstName,
    last_name: event.data?.checkout?.shippingAddress?.lastName,
    address1: event.data?.checkout?.shippingAddress?.address1,
    address2: event.data?.checkout?.shippingAddress?.address2,
    city: event.data?.checkout?.shippingAddress?.city,
    country: event.data?.checkout?.shippingAddress?.country,
    countryCode: event.data?.checkout?.shippingAddress?.countryCode,
    province: event.data?.checkout?.shippingAddress?.province,
    provinceCode: event.data?.checkout?.shippingAddress?.provinceCode,
    zip: event.data?.checkout?.shippingAddress?.zip,
    orderId: event.data?.checkout?.order?.id,
    currency: event.data?.checkout?.currencyCode,
    subtotal: event.data?.checkout?.subtotalPrice?.amount,
    shipping: event.data?.checkout?.shippingLine?.price?.amount,
    value: event.data?.checkout?.totalPrice?.amount,
    tax: event.data?.checkout?.totalTax?.amount,
  });
});

analytics.subscribe("checkout_started", (event) => {
  window.dataLayer.push({
    event: "checkout_started",
    timestamp: event.timestamp,
    id: event.id,
    token: event.data?.checkout?.token,
    url: event.context.document.location.href,
    client_id: event.clientId,
    email: event.data?.checkout?.email,
    phone: event.data?.checkout?.phone,
    first_name: event.data?.checkout?.shippingAddress?.firstName,
    last_name: event.data?.checkout?.shippingAddress?.lastName,
    address1: event.data?.checkout?.shippingAddress?.address1,
    address2: event.data?.checkout?.shippingAddress?.address2,
    city: event.data?.checkout?.shippingAddress?.city,
    country: event.data?.checkout?.shippingAddress?.country,
    countryCode: event.data?.checkout?.shippingAddress?.countryCode,
    province: event.data?.checkout?.shippingAddress?.province,
    provinceCode: event.data?.checkout?.shippingAddress?.provinceCode,
    zip: event.data?.checkout?.shippingAddress?.zip,
    orderId: event.data?.checkout?.order?.id,
    currency: event.data?.checkout?.currencyCode,
    subtotal: event.data?.checkout?.subtotalPrice?.amount,
    shipping: event.data?.checkout?.shippingLine?.price?.amount,
    value: event.data?.checkout?.totalPrice?.amount,
    tax: event.data?.checkout?.totalTax?.amount,
  });
});

analytics.subscribe("product_added_to_cart", (event) => {
  window.dataLayer.push({
    event: "product_added_to_cart",
    timestamp: event.timestamp,
    id: event.id,
    client_id: event.clientId,
    url: event.context.document.location.href,
    price: event.data?.cartLine?.merchandise?.price?.amount,
    currency: event.data?.cartLine?.merchandise?.id,
    product_title: event.data?.cartLine?.merchandise?.product?.title,
    quantity: event.data?.cartLine?.quantity,
    total_cost: event.data?.cartLine?.cost?.totalAmount?.amount,
  });
});

analytics.subscribe("cart_viewed", (event) => {
  window.dataLayer.push({
    event: "cart_viewed",
    timestamp: event.timestamp,
    id: event.id,
    client_id: event.clientId,
    url: event.context.document.location.href,
    total_cost: event.data?.cart?.cost?.totalAmount?.amount,
    quantity: event.data?.cart?.totalQuantity,
    cart_id: event.data?.cart?.id,
  });
});

analytics.subscribe("page_viewed", (event) => {
  window.dataLayer.push({
    event: "page_viewed",
    timestamp: event.timestamp,
    id: event.id,
    client_id: event.clientId,
    url: event.context.document.location.href,
    page_title: event.context.document.title,
  });
});

analytics.subscribe("product_viewed", (event) => {
  window.dataLayer.push({
    event: "product_viewed",
    timestamp: event.timestamp,
    id: event.id,
    client_id: event.clientId,
    url: event.context.document.location.href,
    product_id: event.data?.productVariant?.product?.id,
    product_title: event.data?.productVariant?.title,
    product_sku: event.data?.productVariant?.sku,
  });
});

analytics.subscribe("search_submitted", (event) => {
  window.dataLayer.push({
    event: "search_submitted",
    timestamp: event.timestamp,
    id: event.id,
    client_id: event.clientId,
    url: event.context.document.location.href,
    query: event.data?.searchResult?.query,
  });
});

analytics.subscribe("collection_viewed", (event) => {
  window.dataLayer.push({
    event: "collection_viewed",
    timestamp: event.timestamp,
    id: event.id,
    client_id: event.clientId,
    url: event.context.document.location.href,
    collection_id: event.data?.collection?.id,
    collection_title: event.data?.collection?.title,
  });
});
Remove the placeholder text from the custom pixel you created and replace it with the code above. Then, be sure to place the "GTM-XXXXXXX" with your actual Tag Manager container ID. Once you've updated the placeholder ID, click the connect button so that your custom pixel will become active and start listening to customer events in your checkout.
Next, you'd normally have to create a Google Ads conversion tag, and also create a trigger based off javascript event that fires when someone purchases. You'd also have to create a few specific variables so that revenue and enhanced conversion data are correctly passed to the Google Ads tag. But I'm going to save you that trouble with a handy container file that'll have all of these pieces pre-built for you.
Uploading the Container File
To upload the container file, go to the Admin section of your GTM account. Under the right column, click "Import Container".
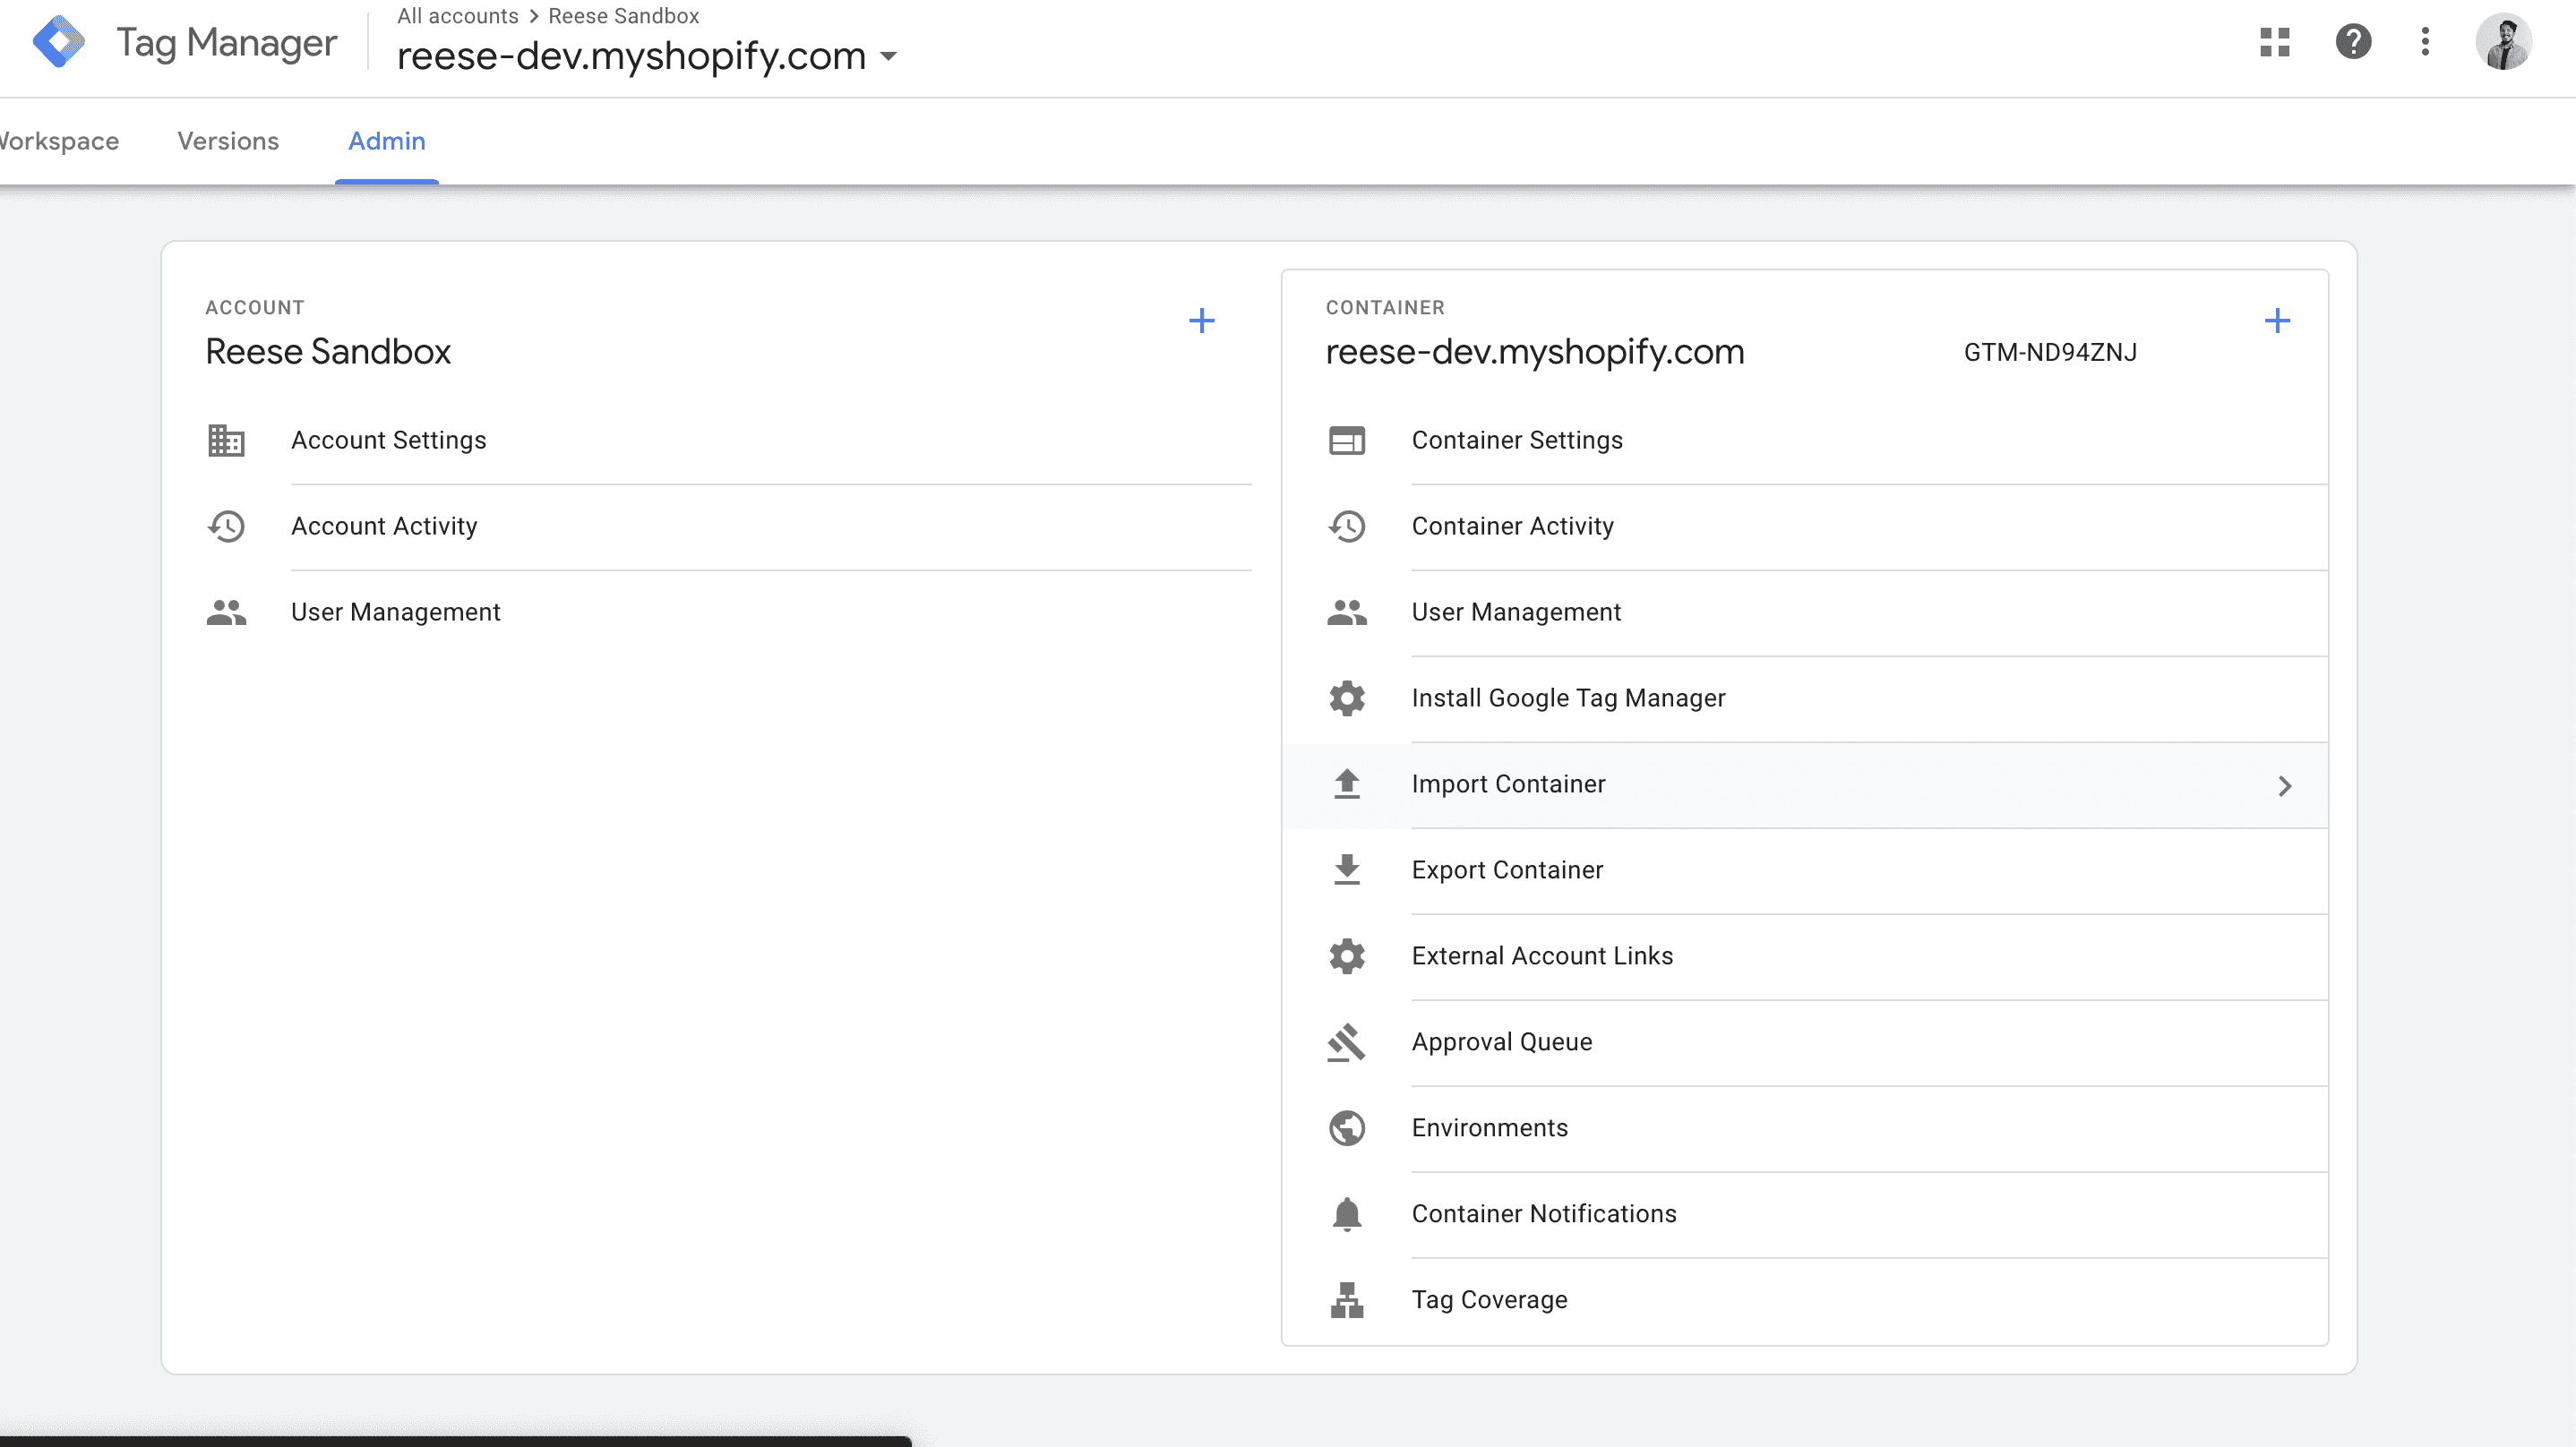
This will bring up the option to upload a file. Before you click "choose container file," click here to download the container file I've created, then upload this json file to GTM.
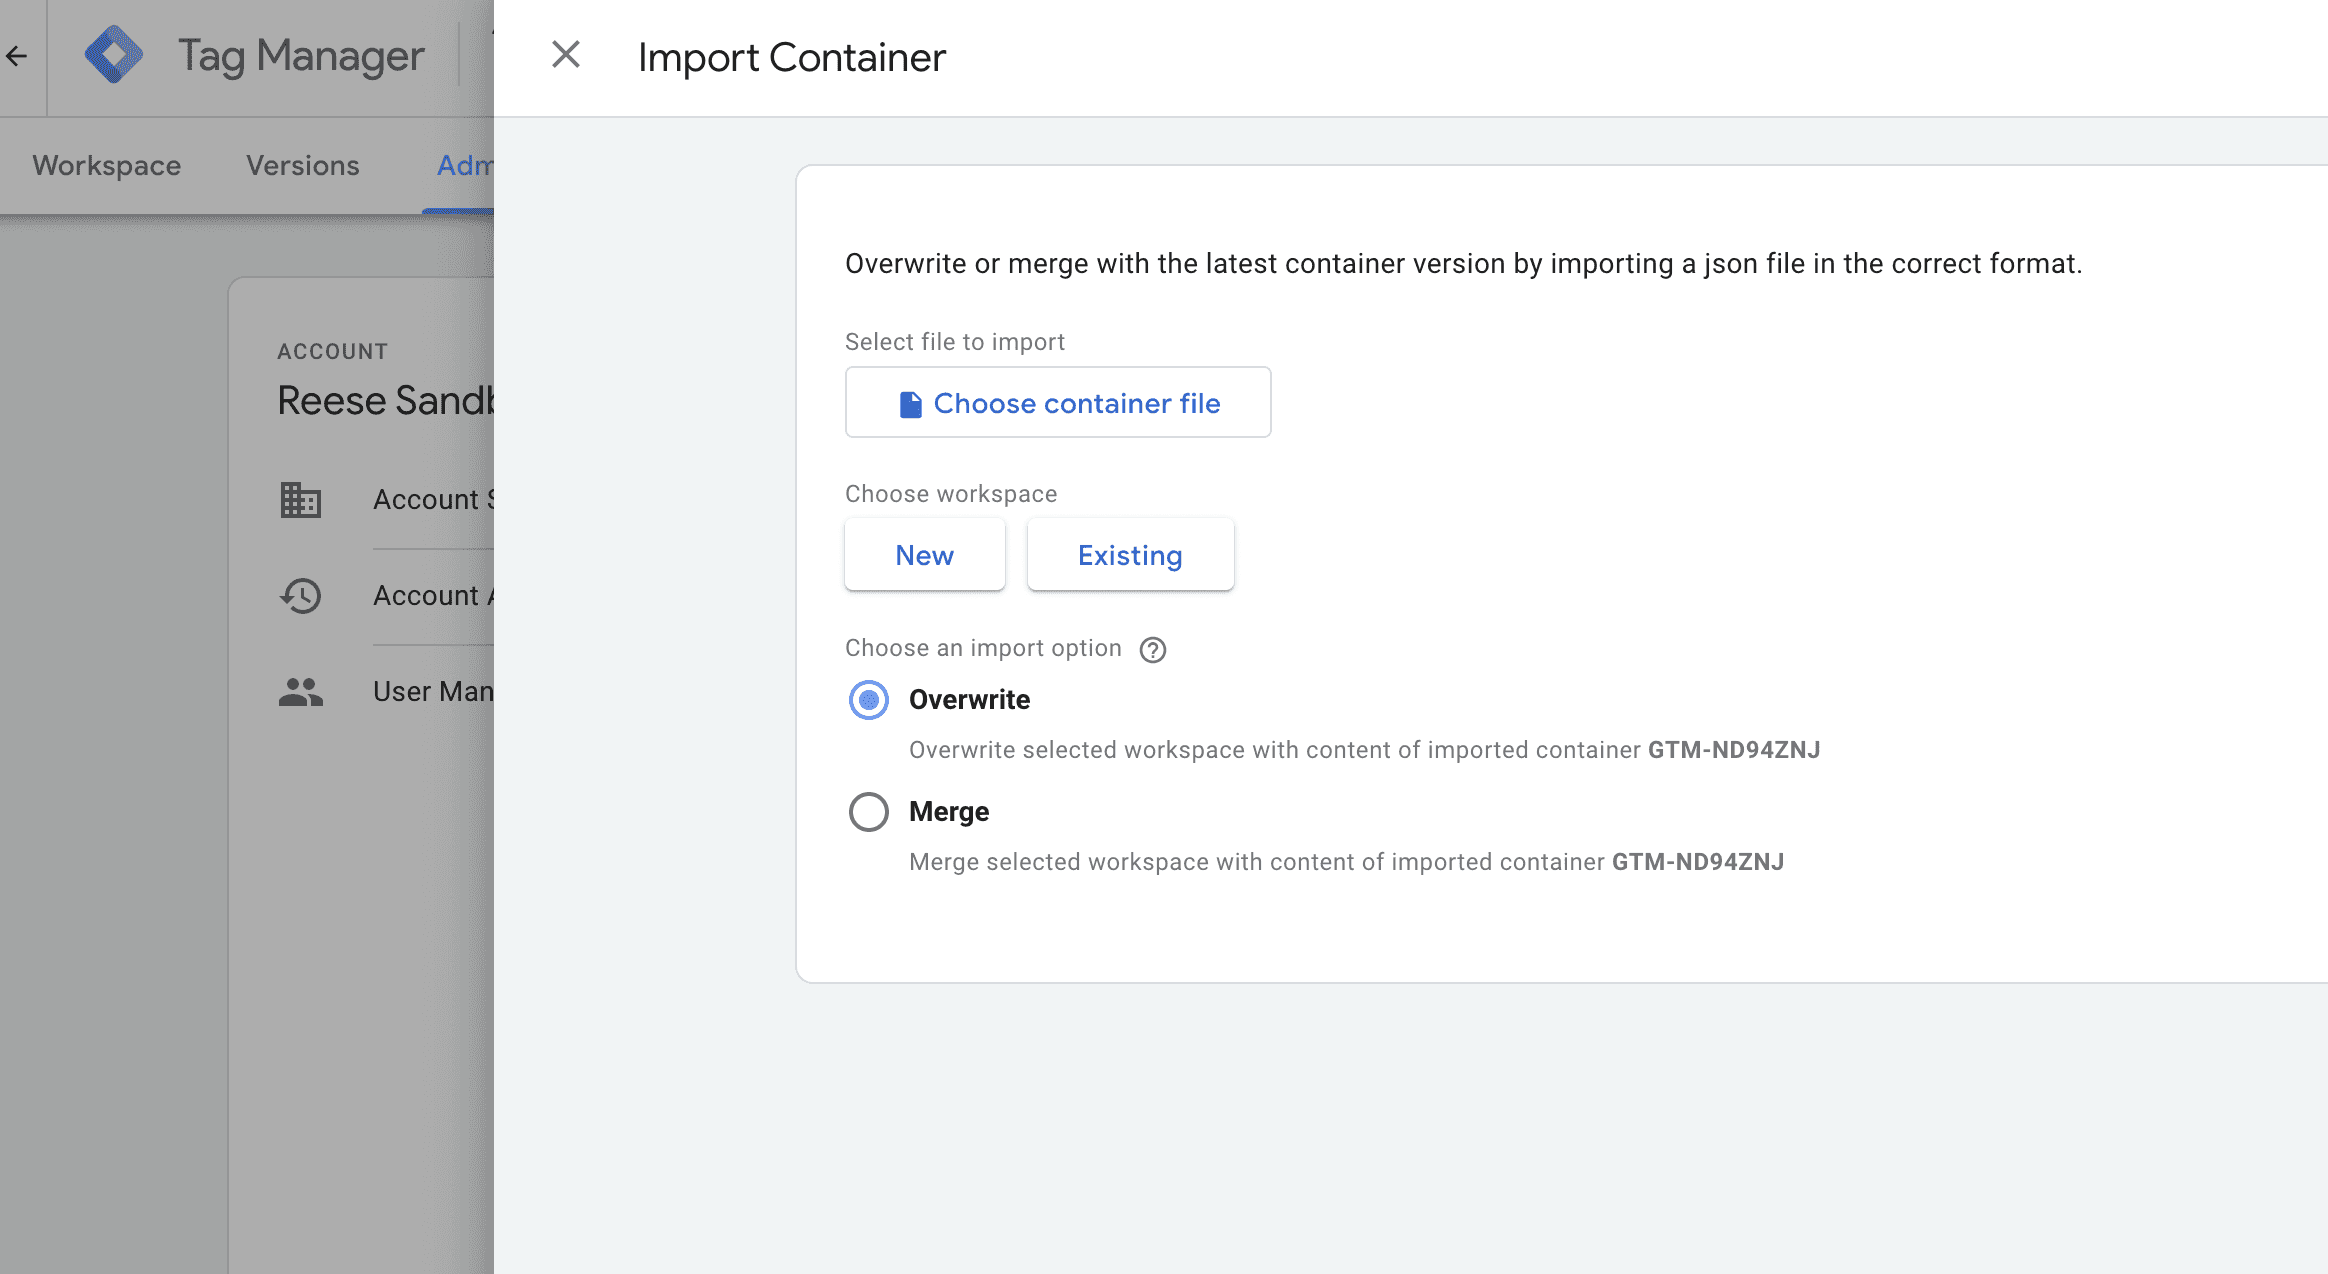
Under "Choose Workspace," choose "Existing".
This next part is important to ensure you don't lose any existing pieces in your GTM account. Under "Choose an Import Option," choose Merge—not overwrite. And below Merge, choose "Rename conflicting tags, triggers, and variables". In case you have any assets in your Tag Manager account that are similar to the ones in this file, this ensures that none of those existing pieces are deleted. If you choose to, you can always delete any older items later if you end up not needing them, but these options can prevent any unintended deletion.
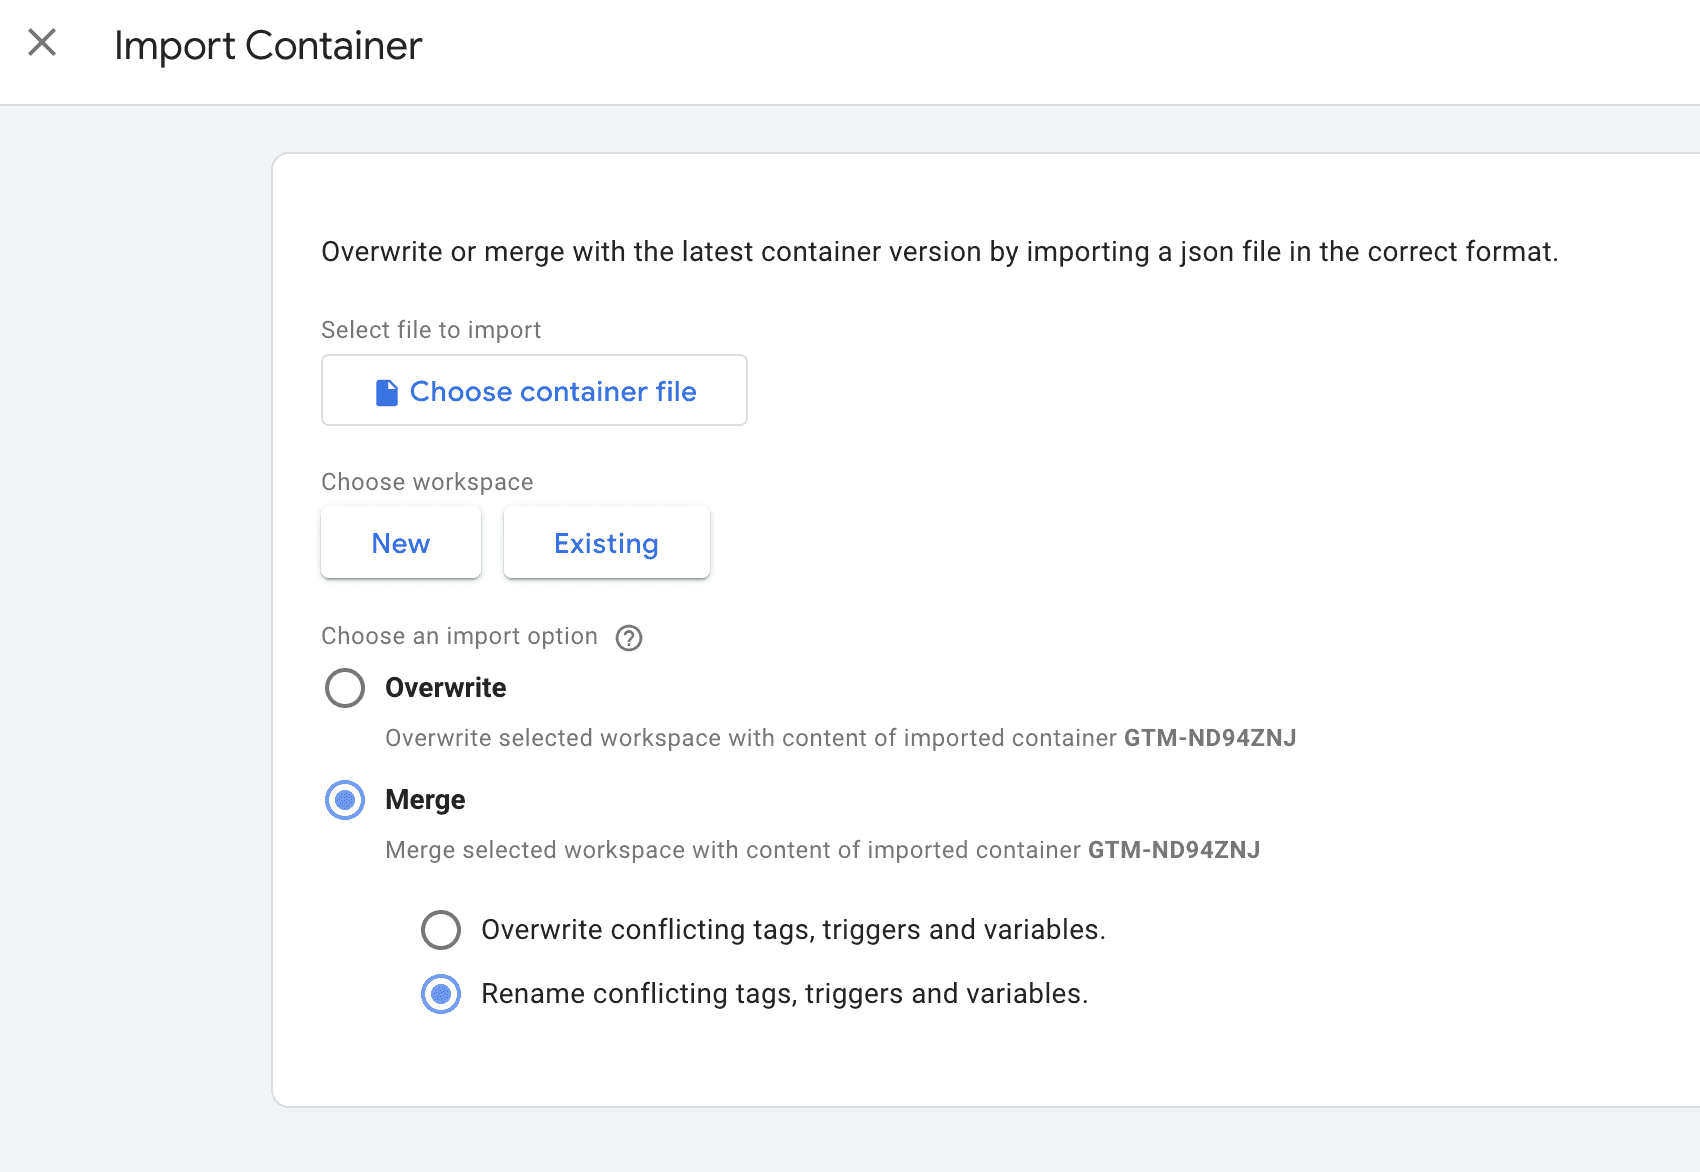
Once you've selected those options, click Add to Workspace to add the tags, triggers, and variables.
Configure the Google Ads Tags
We're close to finishing our setup. While the variables and triggers are already fully compatible with the code in the custom pixel you created, you'll still need to make a few small adjustments to the Google Ads conversion tags so that they're specific to the conversion actions in your account. This is the final piece in making sure conversion data makes its way from your store to Google Ads.
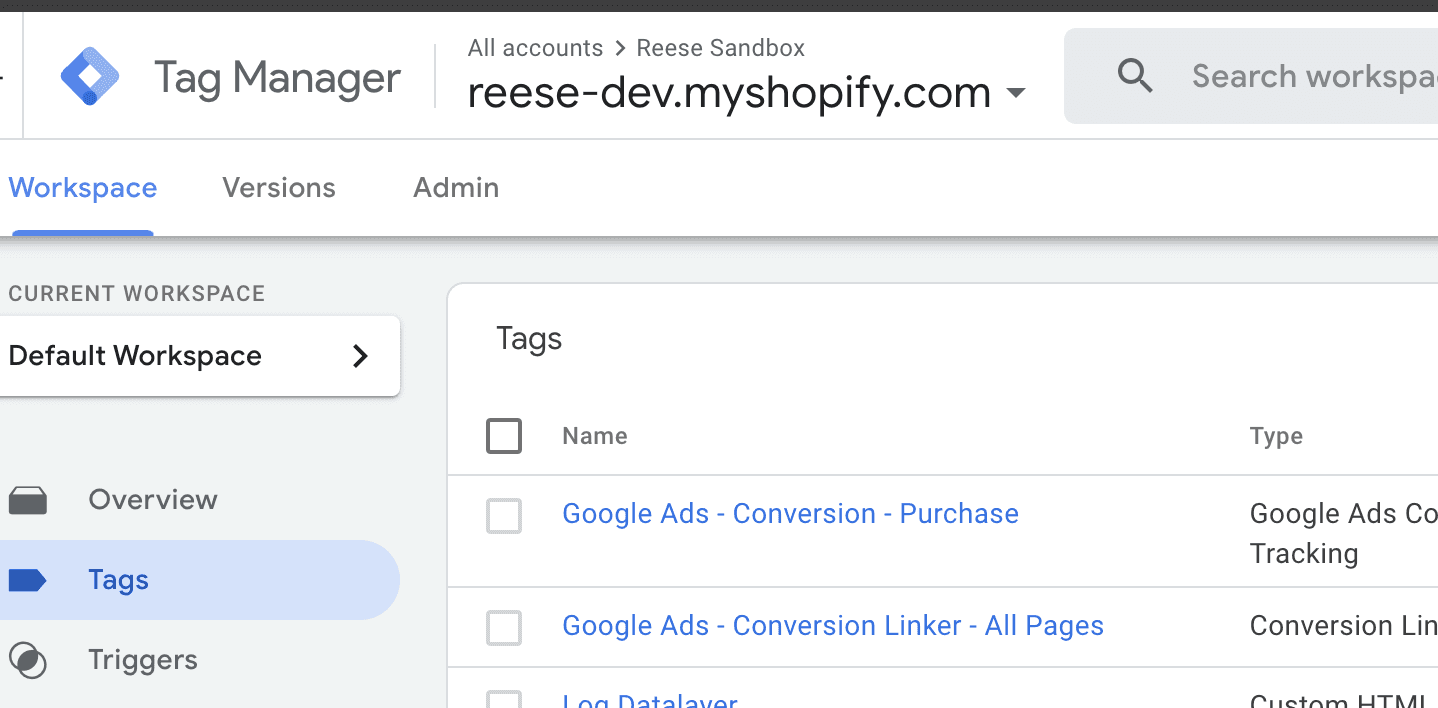
Go back to the Workspace section in Google Tag Manager. Under Tags, click the "Google Ads - Conversion - Purchase" tag.
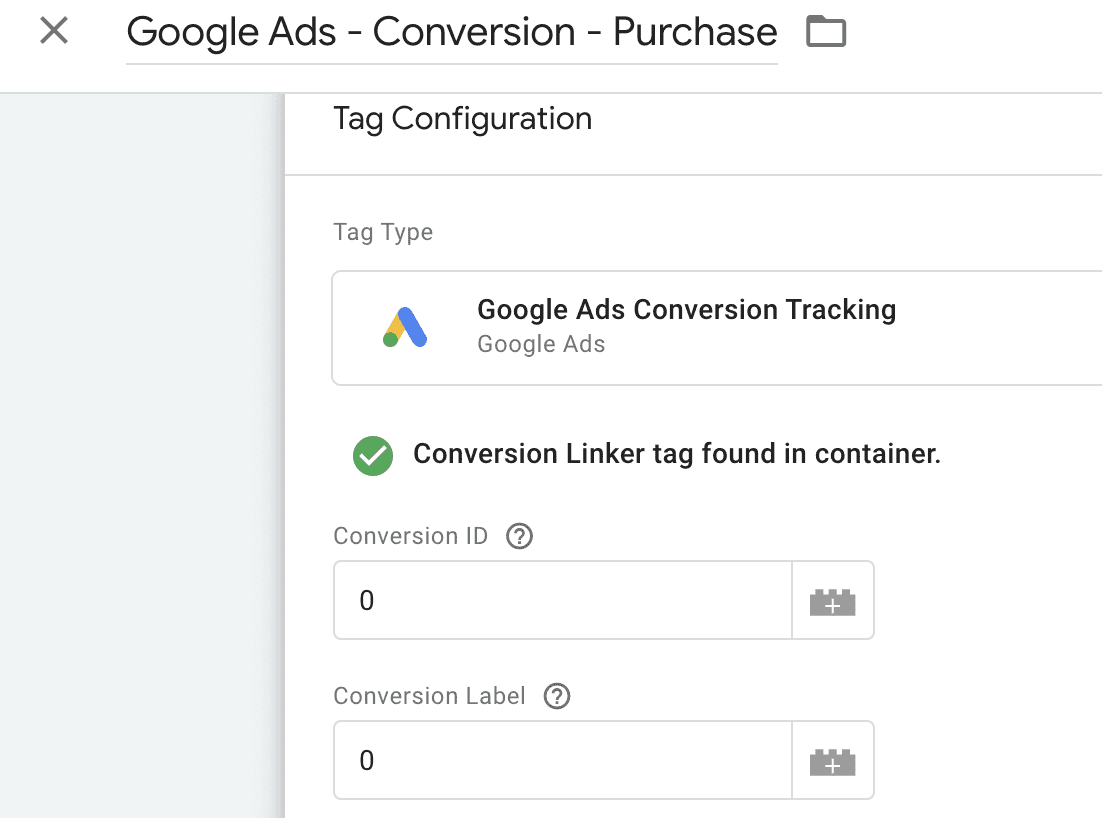
The two fields that you'll need to update here are conversion ID and conversion label.
To get the correct values for these fields, you'll need to log into your Google Ads account. On the left side menu of your Google Ads account, hover over Goals, then click Summary.
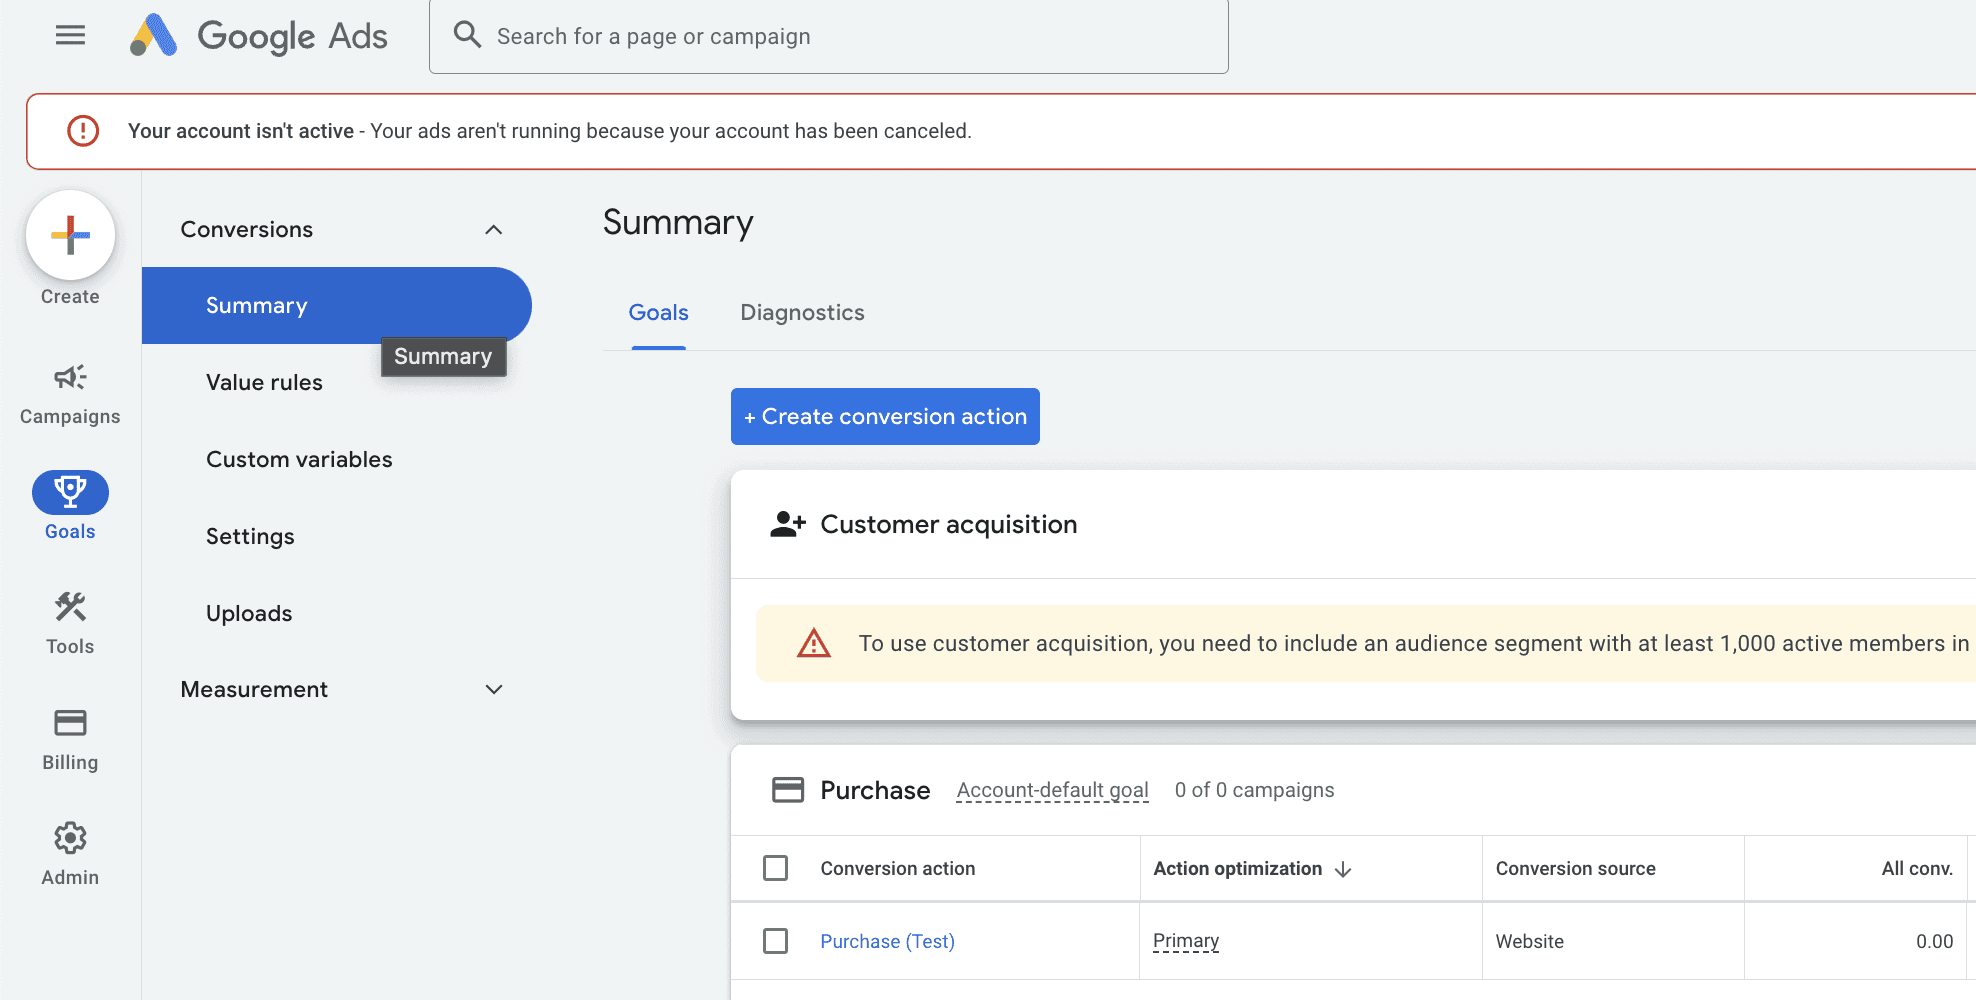
For this next part, I recommend creating a new conversion action if you're already tracking conversions and are just looking for an upgrade. In the event that there are any errors with your setup, creating a separate conversion action and setting it as Secondary will do two things:
First, creating a separate conversion action will prevent any data loss by allowing your existing conversion action to continue running smoothly
Second, setting your new conversion action as secondary will prevent your new conversion from being "double-counted" in your campaign optimization and reporting. (We'll cover how to transition to your new enhanced conversion shortly.)
Once you've created your new conversion action, open on the Tag Setup options, Use Google Tag Manager. You'll want to copy the value below conversion ID into the conversion ID field, and then you'll copy the conversion label into the conversion label field.
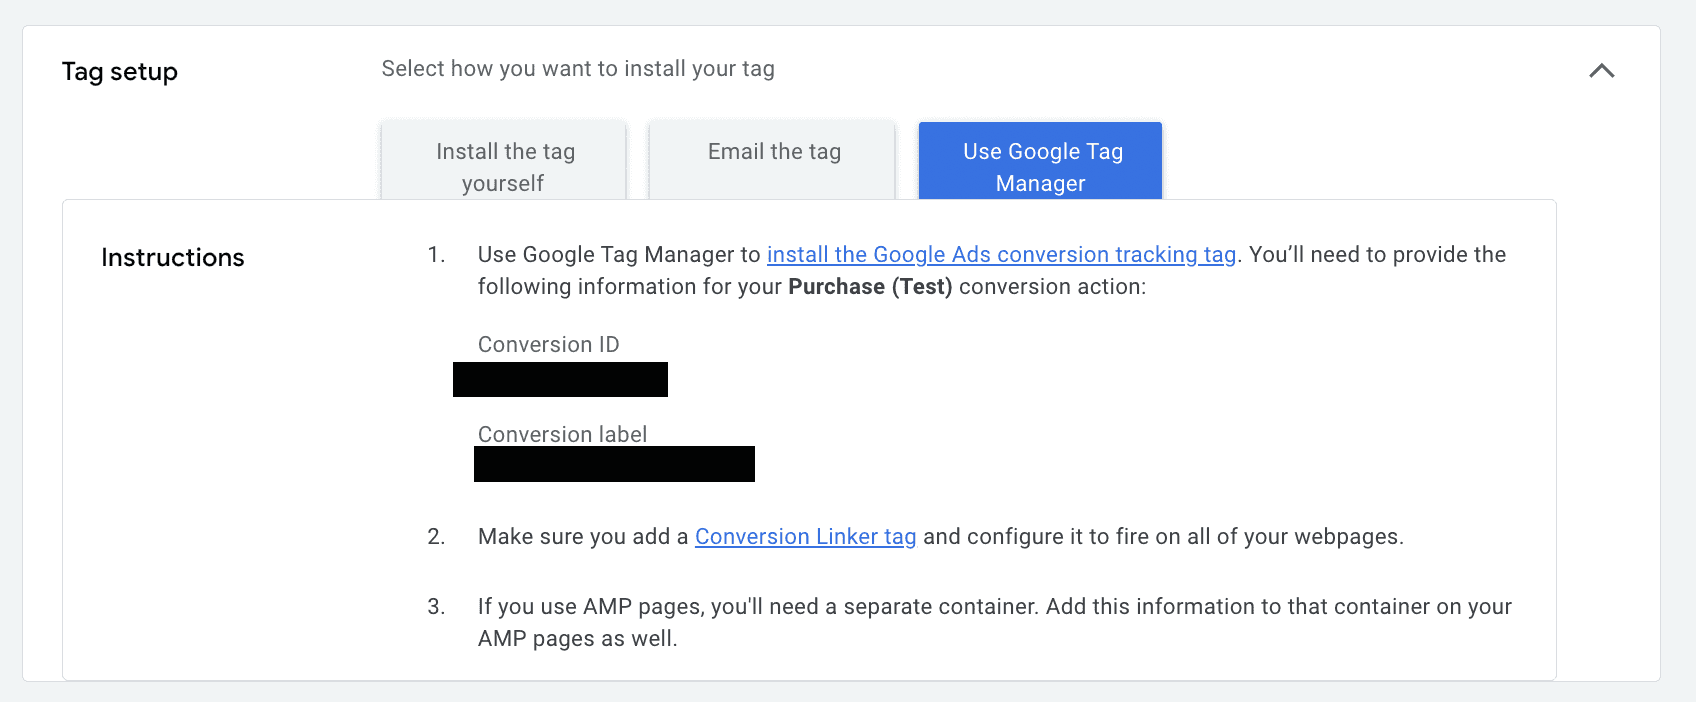
And that's it! At this point, you have everything you need in Google Tag Manager to measure purchases with enhanced conversions from Shopify.
Before we wrap up, let's talk about how to transition to your new conversion action. As I mentioned above, if you have an existing conversion action, don't remove it and let it continue to be your primary conversion action for the next 30 days. This is important for maintaining stability in your account performance, especially if you're using Smart Bidding or Performance Max.
Why? New conversion actions don't have historical data, and they don't necessarily inherit your account's historical data. So switching to a new conversion action before it's had a chance to accrue any data might cause your smart bidding strategies to suddenly throttle bids much lower. In turn, this could cause your account's conversion volume to dip. To avoid this, let your new conversion action collect data for at least 30 days. After 30 days, you can set your old conversion action as secondary and your new one as primary. Adjusting these settings as opposed to removing the conversion actions entirely allows you to maintain a backup option if you need it.
On top of that, keeping both conversion actions in your account will give you a chance to see the benefit of adopting enhanced conversions. In most cases, you'll see that your enhanced conversion is reporting more conversions, which means your smart bidding strategies will have more data to work with and allow your to scale your account's revenue more easily.
When done right, data is a revenue-generating activity! Don't let anyone tell you otherwise.
In August 2024, Shopify transitioned all merchants to a new one-page checkout. While this might make for an easier experience for customers, and even has some security advantages, this update might've disrupted your conversion tracking.
If, like a lot of merchants, you were using Shopify's order status page scripts to load Google Tag Manager or other tracking scripts, the checkout update removed that functionality and caused your conversion tracking to stop working.
You can now set up custom conversion tracking scripts as "Custom Pixels" in the Customer Events tab under your store's Settings. In this post, we'll do a step-by-step walkthrough on how you can add your Google Tag Manager container to your store's checkout section via this new, more secure method.
Prefer video over text? You can also watch this entire walkthrough as a video:
Adding a Custom Pixel
To add a custom pixel, go to your store's Settings, then click the Customer Events option. If you are tracking any conversion events via apps, like Meta's CAPI integration, for example, you'll see those here. You'll also see the option to add a custom pixel, which is what we'll be doing to set up Google Tag Manager. To add your custom pixel, click the "Add a Custom Pixel" button in the upper-right.

This will bring up a prompt to name your custom pixel. Typically, I recommend something like "gtm_custom_pixel" or even your GTM container ID so that it's easy to identify.
Once you've created your custom pixel, you'll see a screen with some placeholder code. This is where we'll paste the code that will allow you to add your GTM container to checkout and track purchases.

Setting Up Google Tag Manager
Don't worry—you don't need to be a JavaScript expert to get through this next section. Shopify has a useful custom pixel template in their support docs. If you don't plan on setting up consent mode for now, you can also copy this version that removes the Google Consent Mode v2 function:
// Define dataLayer and the gtag function.
window.dataLayer = window.dataLayer || [];
function gtag(){dataLayer.push(arguments);}

//Initialize GTM tag
(function(w,d,s,l,i){w[l]=w[l]||[];w[l].push({'gtm.start':
new Date().getTime(),event:'gtm.js'});var f=d.getElementsByTagName(s)[0],
j=d.createElement(s),dl=l!='dataLayer'?'&l='+l:'';j.async=true;j.src=
'https://www.googletagmanager.com/gtm.js?id='+i+dl;f.parentNode.insertBefore(j,f);
})(window,document,'script','dataLayer', 'GTM-XXXXXXX');

//subscribe to events
analytics.subscribe("checkout_completed", (event) => {
  window.dataLayer.push({
    event: "checkout_completed",
    timestamp: event.timestamp,
    id: event.id,
    token: event.data?.checkout?.token,
    url: event.context.document.location.href,
    client_id: event.clientId,
    email: event.data?.checkout?.email,
    phone: event.data?.checkout?.phone,
    first_name: event.data?.checkout?.shippingAddress?.firstName,
    last_name: event.data?.checkout?.shippingAddress?.lastName,
    address1: event.data?.checkout?.shippingAddress?.address1,
    address2: event.data?.checkout?.shippingAddress?.address2,
    city: event.data?.checkout?.shippingAddress?.city,
    country: event.data?.checkout?.shippingAddress?.country,
    countryCode: event.data?.checkout?.shippingAddress?.countryCode,
    province: event.data?.checkout?.shippingAddress?.province,
    provinceCode: event.data?.checkout?.shippingAddress?.provinceCode,
    zip: event.data?.checkout?.shippingAddress?.zip,
    orderId: event.data?.checkout?.order?.id,
    currency: event.data?.checkout?.currencyCode,
    subtotal: event.data?.checkout?.subtotalPrice?.amount,
    shipping: event.data?.checkout?.shippingLine?.price?.amount,
    value: event.data?.checkout?.totalPrice?.amount,
    tax: event.data?.checkout?.totalTax?.amount,
  });
});

analytics.subscribe("payment_info_submitted", (event) => {
  window.dataLayer.push({
    event: "payment_info_submitted",
    timestamp: event.timestamp,
    id: event.id,
    token: event.data?.checkout?.token,
    url: event.context.document.location.href,
    client_id: event.clientId,
    email: event.data?.checkout?.email,
    phone: event.data?.checkout?.phone,
    first_name: event.data?.checkout?.shippingAddress?.firstName,
    last_name: event.data?.checkout?.shippingAddress?.lastName,
    address1: event.data?.checkout?.shippingAddress?.address1,
    address2: event.data?.checkout?.shippingAddress?.address2,
    city: event.data?.checkout?.shippingAddress?.city,
    country: event.data?.checkout?.shippingAddress?.country,
    countryCode: event.data?.checkout?.shippingAddress?.countryCode,
    province: event.data?.checkout?.shippingAddress?.province,
    provinceCode: event.data?.checkout?.shippingAddress?.provinceCode,
    zip: event.data?.checkout?.shippingAddress?.zip,
    orderId: event.data?.checkout?.order?.id,
    currency: event.data?.checkout?.currencyCode,
    subtotal: event.data?.checkout?.subtotalPrice?.amount,
    shipping: event.data?.checkout?.shippingLine?.price?.amount,
    value: event.data?.checkout?.totalPrice?.amount,
    tax: event.data?.checkout?.totalTax?.amount,
  });
});

analytics.subscribe("checkout_shipping_info_submitted", (event) => {
  window.dataLayer.push({
    event: checkout_shipping_info_submitted,
    timestamp: event.timestamp,
    id: event.id,
    token: event.data?.checkout?.token,
    url: event.context.document.location.href,
    client_id: event.clientId,
    email: event.data?.checkout?.email,
    phone: event.data?.checkout?.phone,
    first_name: event.data?.checkout?.shippingAddress?.firstName,
    last_name: event.data?.checkout?.shippingAddress?.lastName,
    address1: event.data?.checkout?.shippingAddress?.address1,
    address2: event.data?.checkout?.shippingAddress?.address2,
    city: event.data?.checkout?.shippingAddress?.city,
    country: event.data?.checkout?.shippingAddress?.country,
    countryCode: event.data?.checkout?.shippingAddress?.countryCode,
    province: event.data?.checkout?.shippingAddress?.province,
    provinceCode: event.data?.checkout?.shippingAddress?.provinceCode,
    zip: event.data?.checkout?.shippingAddress?.zip,
    orderId: event.data?.checkout?.order?.id,
    currency: event.data?.checkout?.currencyCode,
    subtotal: event.data?.checkout?.subtotalPrice?.amount,
    shipping: event.data?.checkout?.shippingLine?.price?.amount,
    value: event.data?.checkout?.totalPrice?.amount,
    tax: event.data?.checkout?.totalTax?.amount,
  });
});

analytics.subscribe("checkout_address_info_submitted", (event) => {
  window.dataLayer.push({
    event: "checkout_address_info_submitted",
    timestamp: event.timestamp,
    id: event.id,
    token: event.data?.checkout?.token,
    url: event.context.document.location.href,
    client_id: event.clientId,
    email: event.data?.checkout?.email,
    phone: event.data?.checkout?.phone,
    first_name: event.data?.checkout?.shippingAddress?.firstName,
    last_name: event.data?.checkout?.shippingAddress?.lastName,
    address1: event.data?.checkout?.shippingAddress?.address1,
    address2: event.data?.checkout?.shippingAddress?.address2,
    city: event.data?.checkout?.shippingAddress?.city,
    country: event.data?.checkout?.shippingAddress?.country,
    countryCode: event.data?.checkout?.shippingAddress?.countryCode,
    province: event.data?.checkout?.shippingAddress?.province,
    provinceCode: event.data?.checkout?.shippingAddress?.provinceCode,
    zip: event.data?.checkout?.shippingAddress?.zip,
    orderId: event.data?.checkout?.order?.id,
    currency: event.data?.checkout?.currencyCode,
    subtotal: event.data?.checkout?.subtotalPrice?.amount,
    shipping: event.data?.checkout?.shippingLine?.price?.amount,
    value: event.data?.checkout?.totalPrice?.amount,
    tax: event.data?.checkout?.totalTax?.amount,
  });
});

analytics.subscribe("checkout_contact_info_submitted", (event) => {
  window.dataLayer.push({
    event: "checkout_contact_info_submitted",
    timestamp: event.timestamp,
    id: event.id,
    token: event.data?.checkout?.token,
    url: event.context.document.location.href,
    client_id: event.clientId,
    email: event.data?.checkout?.email,
    phone: event.data?.checkout?.phone,
    first_name: event.data?.checkout?.shippingAddress?.firstName,
    last_name: event.data?.checkout?.shippingAddress?.lastName,
    address1: event.data?.checkout?.shippingAddress?.address1,
    address2: event.data?.checkout?.shippingAddress?.address2,
    city: event.data?.checkout?.shippingAddress?.city,
    country: event.data?.checkout?.shippingAddress?.country,
    countryCode: event.data?.checkout?.shippingAddress?.countryCode,
    province: event.data?.checkout?.shippingAddress?.province,
    provinceCode: event.data?.checkout?.shippingAddress?.provinceCode,
    zip: event.data?.checkout?.shippingAddress?.zip,
    orderId: event.data?.checkout?.order?.id,
    currency: event.data?.checkout?.currencyCode,
    subtotal: event.data?.checkout?.subtotalPrice?.amount,
    shipping: event.data?.checkout?.shippingLine?.price?.amount,
    value: event.data?.checkout?.totalPrice?.amount,
    tax: event.data?.checkout?.totalTax?.amount,
  });
});

analytics.subscribe("checkout_started", (event) => {
  window.dataLayer.push({
    event: "checkout_started",
    timestamp: event.timestamp,
    id: event.id,
    token: event.data?.checkout?.token,
    url: event.context.document.location.href,
    client_id: event.clientId,
    email: event.data?.checkout?.email,
    phone: event.data?.checkout?.phone,
    first_name: event.data?.checkout?.shippingAddress?.firstName,
    last_name: event.data?.checkout?.shippingAddress?.lastName,
    address1: event.data?.checkout?.shippingAddress?.address1,
    address2: event.data?.checkout?.shippingAddress?.address2,
    city: event.data?.checkout?.shippingAddress?.city,
    country: event.data?.checkout?.shippingAddress?.country,
    countryCode: event.data?.checkout?.shippingAddress?.countryCode,
    province: event.data?.checkout?.shippingAddress?.province,
    provinceCode: event.data?.checkout?.shippingAddress?.provinceCode,
    zip: event.data?.checkout?.shippingAddress?.zip,
    orderId: event.data?.checkout?.order?.id,
    currency: event.data?.checkout?.currencyCode,
    subtotal: event.data?.checkout?.subtotalPrice?.amount,
    shipping: event.data?.checkout?.shippingLine?.price?.amount,
    value: event.data?.checkout?.totalPrice?.amount,
    tax: event.data?.checkout?.totalTax?.amount,
  });
});

analytics.subscribe("product_added_to_cart", (event) => {
  window.dataLayer.push({
    event: "product_added_to_cart",
    timestamp: event.timestamp,
    id: event.id,
    client_id: event.clientId,
    url: event.context.document.location.href,
    price: event.data?.cartLine?.merchandise?.price?.amount,
    currency: event.data?.cartLine?.merchandise?.id,
    product_title: event.data?.cartLine?.merchandise?.product?.title,
    quantity: event.data?.cartLine?.quantity,
    total_cost: event.data?.cartLine?.cost?.totalAmount?.amount,
  });
});

analytics.subscribe("cart_viewed", (event) => {
  window.dataLayer.push({
    event: "cart_viewed",
    timestamp: event.timestamp,
    id: event.id,
    client_id: event.clientId,
    url: event.context.document.location.href,
    total_cost: event.data?.cart?.cost?.totalAmount?.amount,
    quantity: event.data?.cart?.totalQuantity,
    cart_id: event.data?.cart?.id,
  });
});

analytics.subscribe("page_viewed", (event) => {
  window.dataLayer.push({
    event: "page_viewed",
    timestamp: event.timestamp,
    id: event.id,
    client_id: event.clientId,
    url: event.context.document.location.href,
    page_title: event.context.document.title,
  });
});

analytics.subscribe("product_viewed", (event) => {
  window.dataLayer.push({
    event: "product_viewed",
    timestamp: event.timestamp,
    id: event.id,
    client_id: event.clientId,
    url: event.context.document.location.href,
    product_id: event.data?.productVariant?.product?.id,
    product_title: event.data?.productVariant?.title,
    product_sku: event.data?.productVariant?.sku,
  });
});

analytics.subscribe("search_submitted", (event) => {
  window.dataLayer.push({
    event: "search_submitted",
    timestamp: event.timestamp,
    id: event.id,
    client_id: event.clientId,
    url: event.context.document.location.href,
    query: event.data?.searchResult?.query,
  });
});

analytics.subscribe("collection_viewed", (event) => {
  window.dataLayer.push({
    event: "collection_viewed",
    timestamp: event.timestamp,
    id: event.id,
    client_id: event.clientId,
    url: event.context.document.location.href,
    collection_id: event.data?.collection?.id,
    collection_title: event.data?.collection?.title,
  });
});
Remove the placeholder text from the custom pixel you created and replace it with the code above. Then, be sure to place the "GTM-XXXXXXX" with your actual Tag Manager container ID. Once you've updated the placeholder ID, click the connect button so that your custom pixel will become active and start listening to customer events in your checkout.
Next, you'd normally have to create a Google Ads conversion tag, and also create a trigger based off javascript event that fires when someone purchases. You'd also have to create a few specific variables so that revenue and enhanced conversion data are correctly passed to the Google Ads tag. But I'm going to save you that trouble with a handy container file that'll have all of these pieces pre-built for you.
Uploading the Container File
To upload the container file, go to the Admin section of your GTM account. Under the right column, click "Import Container".

This will bring up the option to upload a file. Before you click "choose container file," click here to download the container file I've created, then upload this json file to GTM.

Under "Choose Workspace," choose "Existing".
This next part is important to ensure you don't lose any existing pieces in your GTM account. Under "Choose an Import Option," choose Merge—not overwrite. And below Merge, choose "Rename conflicting tags, triggers, and variables". In case you have any assets in your Tag Manager account that are similar to the ones in this file, this ensures that none of those existing pieces are deleted. If you choose to, you can always delete any older items later if you end up not needing them, but these options can prevent any unintended deletion.

Once you've selected those options, click Add to Workspace to add the tags, triggers, and variables.
Configure the Google Ads Tags
We're close to finishing our setup. While the variables and triggers are already fully compatible with the code in the custom pixel you created, you'll still need to make a few small adjustments to the Google Ads conversion tags so that they're specific to the conversion actions in your account. This is the final piece in making sure conversion data makes its way from your store to Google Ads.
Go back to the Workspace section in Google Tag Manager. Under Tags, click the "Google Ads - Conversion - Purchase" tag.

The two fields that you'll need to update here are conversion ID and conversion label.

To get the correct values for these fields, you'll need to log into your Google Ads account. On the left side menu of your Google Ads account, hover over Goals, then click Summary.

For this next part, I recommend creating a new conversion action if you're already tracking conversions and are just looking for an upgrade. In the event that there are any errors with your setup, creating a separate conversion action and setting it as Secondary will do two things:
First, creating a separate conversion action will prevent any data loss by allowing your existing conversion action to continue running smoothly
Second, setting your new conversion action as secondary will prevent your new conversion from being "double-counted" in your campaign optimization and reporting. (We'll cover how to transition to your new enhanced conversion shortly.)
Once you've created your new conversion action, open on the Tag Setup options, Use Google Tag Manager. You'll want to copy the value below conversion ID into the conversion ID field, and then you'll copy the conversion label into the conversion label field.

And that's it! At this point, you have everything you need in Google Tag Manager to measure purchases with enhanced conversions from Shopify.
Before we wrap up, let's talk about how to transition to your new conversion action. As I mentioned above, if you have an existing conversion action, don't remove it and let it continue to be your primary conversion action for the next 30 days. This is important for maintaining stability in your account performance, especially if you're using Smart Bidding or Performance Max.
Why? New conversion actions don't have historical data, and they don't necessarily inherit your account's historical data. So switching to a new conversion action before it's had a chance to accrue any data might cause your smart bidding strategies to suddenly throttle bids much lower. In turn, this could cause your account's conversion volume to dip. To avoid this, let your new conversion action collect data for at least 30 days. After 30 days, you can set your old conversion action as secondary and your new one as primary. Adjusting these settings as opposed to removing the conversion actions entirely allows you to maintain a backup option if you need it.
On top of that, keeping both conversion actions in your account will give you a chance to see the benefit of adopting enhanced conversions. In most cases, you'll see that your enhanced conversion is reporting more conversions, which means your smart bidding strategies will have more data to work with and allow your to scale your account's revenue more easily.
When done right, data is a revenue-generating activity! Don't let anyone tell you otherwise.
In August 2024, Shopify transitioned all merchants to a new one-page checkout. While this might make for an easier experience for customers, and even has some security advantages, this update might've disrupted your conversion tracking.
If, like a lot of merchants, you were using Shopify's order status page scripts to load Google Tag Manager or other tracking scripts, the checkout update removed that functionality and caused your conversion tracking to stop working.
You can now set up custom conversion tracking scripts as "Custom Pixels" in the Customer Events tab under your store's Settings. In this post, we'll do a step-by-step walkthrough on how you can add your Google Tag Manager container to your store's checkout section via this new, more secure method.
Prefer video over text? You can also watch this entire walkthrough as a video:
Adding a Custom Pixel
To add a custom pixel, go to your store's Settings, then click the Customer Events option. If you are tracking any conversion events via apps, like Meta's CAPI integration, for example, you'll see those here. You'll also see the option to add a custom pixel, which is what we'll be doing to set up Google Tag Manager. To add your custom pixel, click the "Add a Custom Pixel" button in the upper-right.

This will bring up a prompt to name your custom pixel. Typically, I recommend something like "gtm_custom_pixel" or even your GTM container ID so that it's easy to identify.
Once you've created your custom pixel, you'll see a screen with some placeholder code. This is where we'll paste the code that will allow you to add your GTM container to checkout and track purchases.

Setting Up Google Tag Manager
Don't worry—you don't need to be a JavaScript expert to get through this next section. Shopify has a useful custom pixel template in their support docs. If you don't plan on setting up consent mode for now, you can also copy this version that removes the Google Consent Mode v2 function:
// Define dataLayer and the gtag function.
window.dataLayer = window.dataLayer || [];
function gtag(){dataLayer.push(arguments);}

//Initialize GTM tag
(function(w,d,s,l,i){w[l]=w[l]||[];w[l].push({'gtm.start':
new Date().getTime(),event:'gtm.js'});var f=d.getElementsByTagName(s)[0],
j=d.createElement(s),dl=l!='dataLayer'?'&l='+l:'';j.async=true;j.src=
'https://www.googletagmanager.com/gtm.js?id='+i+dl;f.parentNode.insertBefore(j,f);
})(window,document,'script','dataLayer', 'GTM-XXXXXXX');

//subscribe to events
analytics.subscribe("checkout_completed", (event) => {
  window.dataLayer.push({
    event: "checkout_completed",
    timestamp: event.timestamp,
    id: event.id,
    token: event.data?.checkout?.token,
    url: event.context.document.location.href,
    client_id: event.clientId,
    email: event.data?.checkout?.email,
    phone: event.data?.checkout?.phone,
    first_name: event.data?.checkout?.shippingAddress?.firstName,
    last_name: event.data?.checkout?.shippingAddress?.lastName,
    address1: event.data?.checkout?.shippingAddress?.address1,
    address2: event.data?.checkout?.shippingAddress?.address2,
    city: event.data?.checkout?.shippingAddress?.city,
    country: event.data?.checkout?.shippingAddress?.country,
    countryCode: event.data?.checkout?.shippingAddress?.countryCode,
    province: event.data?.checkout?.shippingAddress?.province,
    provinceCode: event.data?.checkout?.shippingAddress?.provinceCode,
    zip: event.data?.checkout?.shippingAddress?.zip,
    orderId: event.data?.checkout?.order?.id,
    currency: event.data?.checkout?.currencyCode,
    subtotal: event.data?.checkout?.subtotalPrice?.amount,
    shipping: event.data?.checkout?.shippingLine?.price?.amount,
    value: event.data?.checkout?.totalPrice?.amount,
    tax: event.data?.checkout?.totalTax?.amount,
  });
});

analytics.subscribe("payment_info_submitted", (event) => {
  window.dataLayer.push({
    event: "payment_info_submitted",
    timestamp: event.timestamp,
    id: event.id,
    token: event.data?.checkout?.token,
    url: event.context.document.location.href,
    client_id: event.clientId,
    email: event.data?.checkout?.email,
    phone: event.data?.checkout?.phone,
    first_name: event.data?.checkout?.shippingAddress?.firstName,
    last_name: event.data?.checkout?.shippingAddress?.lastName,
    address1: event.data?.checkout?.shippingAddress?.address1,
    address2: event.data?.checkout?.shippingAddress?.address2,
    city: event.data?.checkout?.shippingAddress?.city,
    country: event.data?.checkout?.shippingAddress?.country,
    countryCode: event.data?.checkout?.shippingAddress?.countryCode,
    province: event.data?.checkout?.shippingAddress?.province,
    provinceCode: event.data?.checkout?.shippingAddress?.provinceCode,
    zip: event.data?.checkout?.shippingAddress?.zip,
    orderId: event.data?.checkout?.order?.id,
    currency: event.data?.checkout?.currencyCode,
    subtotal: event.data?.checkout?.subtotalPrice?.amount,
    shipping: event.data?.checkout?.shippingLine?.price?.amount,
    value: event.data?.checkout?.totalPrice?.amount,
    tax: event.data?.checkout?.totalTax?.amount,
  });
});

analytics.subscribe("checkout_shipping_info_submitted", (event) => {
  window.dataLayer.push({
    event: checkout_shipping_info_submitted,
    timestamp: event.timestamp,
    id: event.id,
    token: event.data?.checkout?.token,
    url: event.context.document.location.href,
    client_id: event.clientId,
    email: event.data?.checkout?.email,
    phone: event.data?.checkout?.phone,
    first_name: event.data?.checkout?.shippingAddress?.firstName,
    last_name: event.data?.checkout?.shippingAddress?.lastName,
    address1: event.data?.checkout?.shippingAddress?.address1,
    address2: event.data?.checkout?.shippingAddress?.address2,
    city: event.data?.checkout?.shippingAddress?.city,
    country: event.data?.checkout?.shippingAddress?.country,
    countryCode: event.data?.checkout?.shippingAddress?.countryCode,
    province: event.data?.checkout?.shippingAddress?.province,
    provinceCode: event.data?.checkout?.shippingAddress?.provinceCode,
    zip: event.data?.checkout?.shippingAddress?.zip,
    orderId: event.data?.checkout?.order?.id,
    currency: event.data?.checkout?.currencyCode,
    subtotal: event.data?.checkout?.subtotalPrice?.amount,
    shipping: event.data?.checkout?.shippingLine?.price?.amount,
    value: event.data?.checkout?.totalPrice?.amount,
    tax: event.data?.checkout?.totalTax?.amount,
  });
});

analytics.subscribe("checkout_address_info_submitted", (event) => {
  window.dataLayer.push({
    event: "checkout_address_info_submitted",
    timestamp: event.timestamp,
    id: event.id,
    token: event.data?.checkout?.token,
    url: event.context.document.location.href,
    client_id: event.clientId,
    email: event.data?.checkout?.email,
    phone: event.data?.checkout?.phone,
    first_name: event.data?.checkout?.shippingAddress?.firstName,
    last_name: event.data?.checkout?.shippingAddress?.lastName,
    address1: event.data?.checkout?.shippingAddress?.address1,
    address2: event.data?.checkout?.shippingAddress?.address2,
    city: event.data?.checkout?.shippingAddress?.city,
    country: event.data?.checkout?.shippingAddress?.country,
    countryCode: event.data?.checkout?.shippingAddress?.countryCode,
    province: event.data?.checkout?.shippingAddress?.province,
    provinceCode: event.data?.checkout?.shippingAddress?.provinceCode,
    zip: event.data?.checkout?.shippingAddress?.zip,
    orderId: event.data?.checkout?.order?.id,
    currency: event.data?.checkout?.currencyCode,
    subtotal: event.data?.checkout?.subtotalPrice?.amount,
    shipping: event.data?.checkout?.shippingLine?.price?.amount,
    value: event.data?.checkout?.totalPrice?.amount,
    tax: event.data?.checkout?.totalTax?.amount,
  });
});

analytics.subscribe("checkout_contact_info_submitted", (event) => {
  window.dataLayer.push({
    event: "checkout_contact_info_submitted",
    timestamp: event.timestamp,
    id: event.id,
    token: event.data?.checkout?.token,
    url: event.context.document.location.href,
    client_id: event.clientId,
    email: event.data?.checkout?.email,
    phone: event.data?.checkout?.phone,
    first_name: event.data?.checkout?.shippingAddress?.firstName,
    last_name: event.data?.checkout?.shippingAddress?.lastName,
    address1: event.data?.checkout?.shippingAddress?.address1,
    address2: event.data?.checkout?.shippingAddress?.address2,
    city: event.data?.checkout?.shippingAddress?.city,
    country: event.data?.checkout?.shippingAddress?.country,
    countryCode: event.data?.checkout?.shippingAddress?.countryCode,
    province: event.data?.checkout?.shippingAddress?.province,
    provinceCode: event.data?.checkout?.shippingAddress?.provinceCode,
    zip: event.data?.checkout?.shippingAddress?.zip,
    orderId: event.data?.checkout?.order?.id,
    currency: event.data?.checkout?.currencyCode,
    subtotal: event.data?.checkout?.subtotalPrice?.amount,
    shipping: event.data?.checkout?.shippingLine?.price?.amount,
    value: event.data?.checkout?.totalPrice?.amount,
    tax: event.data?.checkout?.totalTax?.amount,
  });
});

analytics.subscribe("checkout_started", (event) => {
  window.dataLayer.push({
    event: "checkout_started",
    timestamp: event.timestamp,
    id: event.id,
    token: event.data?.checkout?.token,
    url: event.context.document.location.href,
    client_id: event.clientId,
    email: event.data?.checkout?.email,
    phone: event.data?.checkout?.phone,
    first_name: event.data?.checkout?.shippingAddress?.firstName,
    last_name: event.data?.checkout?.shippingAddress?.lastName,
    address1: event.data?.checkout?.shippingAddress?.address1,
    address2: event.data?.checkout?.shippingAddress?.address2,
    city: event.data?.checkout?.shippingAddress?.city,
    country: event.data?.checkout?.shippingAddress?.country,
    countryCode: event.data?.checkout?.shippingAddress?.countryCode,
    province: event.data?.checkout?.shippingAddress?.province,
    provinceCode: event.data?.checkout?.shippingAddress?.provinceCode,
    zip: event.data?.checkout?.shippingAddress?.zip,
    orderId: event.data?.checkout?.order?.id,
    currency: event.data?.checkout?.currencyCode,
    subtotal: event.data?.checkout?.subtotalPrice?.amount,
    shipping: event.data?.checkout?.shippingLine?.price?.amount,
    value: event.data?.checkout?.totalPrice?.amount,
    tax: event.data?.checkout?.totalTax?.amount,
  });
});

analytics.subscribe("product_added_to_cart", (event) => {
  window.dataLayer.push({
    event: "product_added_to_cart",
    timestamp: event.timestamp,
    id: event.id,
    client_id: event.clientId,
    url: event.context.document.location.href,
    price: event.data?.cartLine?.merchandise?.price?.amount,
    currency: event.data?.cartLine?.merchandise?.id,
    product_title: event.data?.cartLine?.merchandise?.product?.title,
    quantity: event.data?.cartLine?.quantity,
    total_cost: event.data?.cartLine?.cost?.totalAmount?.amount,
  });
});

analytics.subscribe("cart_viewed", (event) => {
  window.dataLayer.push({
    event: "cart_viewed",
    timestamp: event.timestamp,
    id: event.id,
    client_id: event.clientId,
    url: event.context.document.location.href,
    total_cost: event.data?.cart?.cost?.totalAmount?.amount,
    quantity: event.data?.cart?.totalQuantity,
    cart_id: event.data?.cart?.id,
  });
});

analytics.subscribe("page_viewed", (event) => {
  window.dataLayer.push({
    event: "page_viewed",
    timestamp: event.timestamp,
    id: event.id,
    client_id: event.clientId,
    url: event.context.document.location.href,
    page_title: event.context.document.title,
  });
});

analytics.subscribe("product_viewed", (event) => {
  window.dataLayer.push({
    event: "product_viewed",
    timestamp: event.timestamp,
    id: event.id,
    client_id: event.clientId,
    url: event.context.document.location.href,
    product_id: event.data?.productVariant?.product?.id,
    product_title: event.data?.productVariant?.title,
    product_sku: event.data?.productVariant?.sku,
  });
});

analytics.subscribe("search_submitted", (event) => {
  window.dataLayer.push({
    event: "search_submitted",
    timestamp: event.timestamp,
    id: event.id,
    client_id: event.clientId,
    url: event.context.document.location.href,
    query: event.data?.searchResult?.query,
  });
});

analytics.subscribe("collection_viewed", (event) => {
  window.dataLayer.push({
    event: "collection_viewed",
    timestamp: event.timestamp,
    id: event.id,
    client_id: event.clientId,
    url: event.context.document.location.href,
    collection_id: event.data?.collection?.id,
    collection_title: event.data?.collection?.title,
  });
});
Remove the placeholder text from the custom pixel you created and replace it with the code above. Then, be sure to place the "GTM-XXXXXXX" with your actual Tag Manager container ID. Once you've updated the placeholder ID, click the connect button so that your custom pixel will become active and start listening to customer events in your checkout.
Next, you'd normally have to create a Google Ads conversion tag, and also create a trigger based off javascript event that fires when someone purchases. You'd also have to create a few specific variables so that revenue and enhanced conversion data are correctly passed to the Google Ads tag. But I'm going to save you that trouble with a handy container file that'll have all of these pieces pre-built for you.
Uploading the Container File
To upload the container file, go to the Admin section of your GTM account. Under the right column, click "Import Container".

This will bring up the option to upload a file. Before you click "choose container file," click here to download the container file I've created, then upload this json file to GTM.

Under "Choose Workspace," choose "Existing".
This next part is important to ensure you don't lose any existing pieces in your GTM account. Under "Choose an Import Option," choose Merge—not overwrite. And below Merge, choose "Rename conflicting tags, triggers, and variables". In case you have any assets in your Tag Manager account that are similar to the ones in this file, this ensures that none of those existing pieces are deleted. If you choose to, you can always delete any older items later if you end up not needing them, but these options can prevent any unintended deletion.

Once you've selected those options, click Add to Workspace to add the tags, triggers, and variables.
Configure the Google Ads Tags
We're close to finishing our setup. While the variables and triggers are already fully compatible with the code in the custom pixel you created, you'll still need to make a few small adjustments to the Google Ads conversion tags so that they're specific to the conversion actions in your account. This is the final piece in making sure conversion data makes its way from your store to Google Ads.
Go back to the Workspace section in Google Tag Manager. Under Tags, click the "Google Ads - Conversion - Purchase" tag.

The two fields that you'll need to update here are conversion ID and conversion label.

To get the correct values for these fields, you'll need to log into your Google Ads account. On the left side menu of your Google Ads account, hover over Goals, then click Summary.

For this next part, I recommend creating a new conversion action if you're already tracking conversions and are just looking for an upgrade. In the event that there are any errors with your setup, creating a separate conversion action and setting it as Secondary will do two things:
First, creating a separate conversion action will prevent any data loss by allowing your existing conversion action to continue running smoothly
Second, setting your new conversion action as secondary will prevent your new conversion from being "double-counted" in your campaign optimization and reporting. (We'll cover how to transition to your new enhanced conversion shortly.)
Once you've created your new conversion action, open on the Tag Setup options, Use Google Tag Manager. You'll want to copy the value below conversion ID into the conversion ID field, and then you'll copy the conversion label into the conversion label field.

And that's it! At this point, you have everything you need in Google Tag Manager to measure purchases with enhanced conversions from Shopify.
Before we wrap up, let's talk about how to transition to your new conversion action. As I mentioned above, if you have an existing conversion action, don't remove it and let it continue to be your primary conversion action for the next 30 days. This is important for maintaining stability in your account performance, especially if you're using Smart Bidding or Performance Max.
Why? New conversion actions don't have historical data, and they don't necessarily inherit your account's historical data. So switching to a new conversion action before it's had a chance to accrue any data might cause your smart bidding strategies to suddenly throttle bids much lower. In turn, this could cause your account's conversion volume to dip. To avoid this, let your new conversion action collect data for at least 30 days. After 30 days, you can set your old conversion action as secondary and your new one as primary. Adjusting these settings as opposed to removing the conversion actions entirely allows you to maintain a backup option if you need it.
On top of that, keeping both conversion actions in your account will give you a chance to see the benefit of adopting enhanced conversions. In most cases, you'll see that your enhanced conversion is reporting more conversions, which means your smart bidding strategies will have more data to work with and allow your to scale your account's revenue more easily.
When done right, data is a revenue-generating activity! Don't let anyone tell you otherwise.
Ready to scale your brand?
If you want to achieve ground-breaking growth with increased sales and profitability with paid ads, then you're in the right place.
Ready to unleash your brand's growth potential?
If you're ready to work with a partner that makes your paid media's ROI clear and simple, it's time to take the next step.
Ready to unleash your brand's growth potential?
If you're ready to work with a partner that makes your paid media's ROI clear and simple, it's time to take the next step.
Ready to unleash your brand's growth potential?
If you're ready to work with a partner that makes your paid media's ROI clear and simple, it's time to take the next step.